Thursday, February 09, 2012

Easiest Homemade Applesauce EVER

We all really love applesauce, but I don't buy it unless I can find natural or no-sugar added applesauce because, really? I just think God made most fruits sweet enough without adding white sugar. So for me, a sugar free recipe was important. I also wanted a little instant gratification and didn't want to wait on a crock pot for hours (though it's REALLY good in a crock pot!).

Now, I can't for the life of me, find the recipe I used, but all it called for was 3 lbs of apples, 1 1/2 cups of water and spices. I used cinnamon, nutmeg and ground cloves because I like it a little spicy. :)


Here's all you do (and again, let me apologize for the pictures ahead of time. a camera phone in my kitchen is not ideal).....


Peel and chop the apples....


Put apples and water in a pot. Add your spices and stir. Let it come to a boil and then lower to a simmer until the apples are really tender...about 15 mins or so.


At that point you can decide what kind of texture you want. You can put it in a blender, food processor or leave it really, really chunky. I decided to use my immersion blender to get it to the consistency we like....creamy with a few chunks. So easy!


And the results?
I think that speaks for itself. :)


Monday, February 06, 2012

My Journey to Simpler: My Notebook Review and My Guest Post!


{I'm working my way through Tsh Oxenreider's book Organized Simplicity. If you missed the first 3 posts you can read them here: family purpose statement, I'm spending 2 days a week on WHAT? and The Home Management Notebook}


So, as you can tell, this journey is a sloooow one.

I haven't posted about it in awhile because I've been making some big changes and I want them to really sink in. After I made the notebook, I put off reading the next chapter because I wanted to actually use the notebook and get used to having one. As you know, I was somewhat skeptical that I would like it, but I'm pleasantly surprised!


I use it almost every day and on the days I don't, I feel a bit lost.


Here a few of the benefits I've noticed that have happened directly because I've used the notebook:

  • a To-Do list each day that (for the most part) actually gets done!
  • I know what we're having for dinner on almost any given night. I have one place where all my meal ideas and recipes are. No more searching around in drawers and on countertops trying to remember where I put the dang grocery list.
  • I have one place where I keep all my ideas for my shop and this blog. My brain has proven pretty unreliable in pregnancy so this is a very good thing.
  • I can now look at our calendar for the month AND plan our meals accordingly at the same time! No more running back and forth from a calendar to the computer, etc trying to remember.
  • My days are broken into blocks of time and tasks are assigned to each block. I can plan for times during the day when my energy is high (morning) and low (afternoon). Now I know that I want to plan my low-energy tasks to get done during the boy's nap time, for example.
  • My weekends are MUCH more restful and I'm spending at least one day just lounging around with my family without feeling guilty because I got so much done during the week.
  • Downtime is more intentional and, therefore, more restful (one of the biggest perks by far).
  • I don't freak out when someone comes by on short notice. My house hasn't been too embarrassing and I have extra food in the freezer to share.
  • I'm more available in general for unplanned events because there is a base level of order that wasn't there before.

I've added my bible study materials to it, a master project list and am hoping to add a place to count the gifts soon (something I've wanted to do for awhile, but haven't because I never had a place to write them down).

So there you have it! Several weeks in and this non-planner is actually enjoying the added bit of structure because.....say my mantra with me.....it serves me and my family!


I may actually need a bigger notebook. :)


{Psst....I have a little guest post over at Stacey and Michelle's place today on how I menu plan. (Stacey is my sweet sis-in-law and Michelle is a dear friend from college who now lives in China!) I'm far from an expert and it's definitely not a how-to....but if you're curious, head over there and take a glance. They have a great blog chock full of things a girl like me needs in her life. I think you'll get a lot out of it too.}


Friday, February 03, 2012

Jewelry Display Ideas

This week I've been getting my shop ready for an arts market that happening here in Charlotte tonight. I'm not a craft fair pro by any means, but I've learned a few tricks for making my table cute, and have had lots of people stop and comment on my displays instead of my jewelry! Maybe I should start another shop...


Since I'm already in the mode, I thought I'd share a few of my cheap, DIY displays.


1. Hanging earring display:

There are lots of them out there floating around on Pinterest...


I found an frame at Hobby Lobby on clearance and have done it this way several times, but I didn't have the wire or jute secured and it almost always led to my earrings crashing down over and over. Then I saw that you could use chicken wire on the back of your frame....
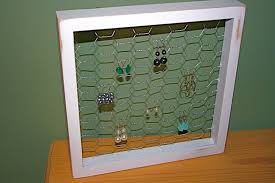


I'm in a hurry today and didn't have time to run to Home Depot for the chicken wire, BUT...

I did have the mesh bag that my oranges came in. (wink, wink)


So, I just cut the mesh bag, pulled it as tight as I could and taped it to the back of the frame.


Works like a charm!

2. Tiered displays

These are SUPER easy to make! I just went to Hobby Lobby, bought several plates on clearance and a couple cheap candle sticks. Then used E6000....the this-stuff-holds-anything glue...and glued the candlesticks to the plates.


This one was made using dollar store pie pans and the same cheap candle sticks. It currently is a fruit holder, but tonight will moonlight as a cute accessories display.

Bringing dignity to the dollar store....it's a calling, y'all. :)

{And yes, for some reason I decided to be different and glue the candlesticks
upside down. Different does not equal better, people.}

Here is just another example of using a plastic plate and cup from the clearance section and a little glue..


3. Hanging jewelry display


This used to be my favorite one until I put that stupid chalkboard label on it. I had just gotten them and thought they were re-usable so I tried it out on my display board. Yeah, they're not reusable and I can't write neatly in chalk to save my life.

I'm talking to someone about it...


So, I found this ugly painting in the....wait for it....Hobby lobby clearance section. It was marked way down so I took it home, flipped the painting around and painted the back of it this Martha Stewart seafoamy color.

(For the record, "Seafoamy" is not the name of the color)

I got Josh to screw in these cute knobs and I spray painted the wrought iron drawer pulls at the bottom (they are turned upside down to hold the earrings). It was all really easy.


Now this is kinda what I want to put in my bathroom...


So, there you go. I'm sure y'all have seen tons of other ideas too. It's so much more fun to use something YOU have made! Have fun. ;)


Thursday, February 02, 2012

Pinterest Project: Sunburst Mirror


Ok, here's the original pin. Isn't it gorgeous? I love how her's pops out against that wall color. Mine didn't turn out quite that good (and there's not as much contrast with my wall color), but I still really like it.

I got the reeds from Hobby Lobby and followed the instructions for cutting them at a few different lengths.


I already had the faceplate to a clock that was broken. I wanted to use it because it already had the hardware on the back to hang so I just took of the hands, removed the battery and frame and then spray painted the face.

I found the round mirror at Hobby Lobby.


Then I used one of my most favorite products, E600 glue, to glue the mirror onto the faceplate. Then stacked books on top for weight while it dried. (fantastic book, btw!)


Then the fun of hot gluing the reeds begins. I staggered the different lengths all the way around. This part was time consuming, but this is where you get the cool starburst shape.


I covered the mirror with paper before spray painting the reeds white.


I primed and then sprayed 2 coats of white on it. Looking back, I think I should have done one more coat. It was challenging to get all the reeds completely covered.


I hate that my pictures of it didn't turn out as great as I had hoped, but you get the general idea here.


One of the things I didn't really expect was how BIG this thing is. It's really big, but I had a pretty big wall space to fill so it fits nicely. :)


It's not perfect, but I like it. :)


Friday, January 27, 2012

House Goals

This has the potential to be one of the most overwhelming topics I could write about, yet it also helps me to organize and then prioritize the projects I would like to tackle. Something my husband would really appreciate.

The Nester had a link up awhile back so I'm really behind, but this is a year of big changes for us and our house is going to have to change as well in order to be up to the task.

In April we will meet our precious Zoe girl, and while we are SO excited about her, we are also feeling a little unsure of how our house is going to adjust to her being here. So, that's the top priority. Getting ready for Zoe. :)


(I will more than likely break these down into smaller posts and show the before and after pics later.)


1. Move Isaiah and Manny into the playroom.

(We have a 3 bedroom, 2 bath house. Right now the boys share the smaller bedroom, and the larger one is a playroom.)

{somewhat feasible boy's room inspiration}

2. Transform the playroom into their bedroom.

3. Make their old bedroom the nursery.


{We are re-using this bedding that we had with Manny.
We chose something neutral because we didn't find out what we
were having. I absolutely love it, but also feel it's my duty to Zoe
to girl it up a bit. I know, I know....she doesn't care.}


{I really like this room. Modern whimsy is sort of
what I'm hoping for. We shall see.}


{Is that not the most precious thing?}


These top 3 things can be broken down further to include:
  • clean out Manny's closet (his clothes are being stored in their bedroom, while Isaiah's clothes have been in the playroom)
  • clean out Isaiah's clothes
  • move Manny's clothes/shoes into the closet/dresser with Isaiah's
  • move the boys' books into their new bedroom
  • acquire and set up bunk beds in the new bedroom
  • reassemble the crib
  • make nursery cute
  • make boys' new bedroom cute


{I love the idea of them having a place to draw on the walls}


{closet inspiration}


{I just love this}


4. Paint hallway, living room and kitchen (or at least touch up a LOT)

5. Paint trim, baseboards and chair rail

6. Paint guest/boys bathroom

7. Paint side table in living room (either a glossy Tiffany blue or gray/blue)

{I wasn't really thinking distressed, but I'm loving the look of that!}


8. New window treatments in every room except kitchen (white with thick yellow horizontal stripes in living room)

{Kinda like this but with yellow}


9. Change out the armoire for a desk in our bedroom.


10. Do this to our bathroom mirrors:


If I stared long enough, I could come up with at least 10 more things, but I'll stop before I put myself into labor.


So, who wants to come help me? :)


Wednesday, January 25, 2012

My Journey to Simpler: The Home Management Notebook


{I'm working my way through Tsh Oxenreider's book Organized Simplicity. If you missed the first 2 posts you can read them here: family purpose statement and I'm spending 2 days a week on WHAT?}


I truly never thought I would EVER title a blog post that.


Moving on. Tsh thinks this is a good idea and since I'm giving this whole thing a fair shot, it was my next step toward living simpler. I must say, though (and she says this in the book), getting to a place of simpler living is hard work. It's much more than cleaning out closets and getting rid of clutter.


I've thought about having a notebook like this for a long time and even started to make it several times, but I was thinking about it all wrong and got easily turned off. I kept thinking of all things I should put in the notebook instead of what I would actually use it for. (Like I said before, if it doesn't serve me and the family.... notgonnadoit.) This is why I've left out a lot of sections that Tsh uses. I just don't need them yet and that's ok. I will add as I go.


A side note: it is very important to me that my notebook look cute....otherwise, I won't be as likely to use it. I discriminate that way. Not with people, just inanimate objects. So, useful and cute. My 2 very important things. I found this printable here.

Also, I had the binder, dividers and page protecters already so this little project was completely free!


Here are the sections I've added:

This is Tsh's daily/weekly/monthly cleaning list. I just slid into a clear sleeve and will mark things off with a dry erase marker as I get them done. Easy peasy.


Recipes I want to try in a section divider and my menu planning printable.


I'm working on getting enough meals into a rotation that I can just plug them into a monthly calendar. I drool at the thought of looking over a month full of meals already planned out. Brilliant.


The reason I get anything done all day. Daily Dockets. My family thanks you, Tsh.


I'm trying out a new way to budget online right now, but I may end up adding a section for it to the notebook along with a section for gifts ideas, kids activities and random work and blog ideas.


What do you think? Do you use one? Is it helpful?

...Is it cute? :)


Pages