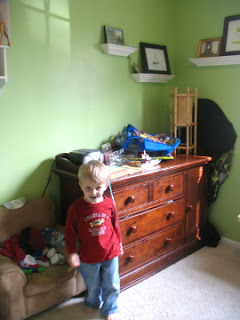
Showing posts with label project/DIY. Show all posts

Friday, March 02, 2012

Decisions, Decisions

Welp. We've moved the boys into the playroom/now-their-bedroom, but their sleep arrangements are very temporary (the full bed they were sleeping in is being converted back into a crib). Right now they are are sleeping in a tent filled with blankets and pillows. It's the one they sleep in at Grammie's house and she was kind enough to let us use it for awhile. They are absolutely thrilled.

But it's not a bed.


{Manny insisted on being in every one of the pictures I took.}


Yesterday, I sat on the floor in there for a long time and just kinda looked around. It's a small room and there's a lot of stuff crammed in it. I'm not happy with it (shocking!) and keep thinking that there's a better way to set it up.


{a glimpse from the door}


A few things that need to happen in there to make it more functional:

  • New paint. The bright green was from Isaiah's jungle themed nursery 5 years ago. Yuck. I'm thinking a soft gray.
  • Take down all nursery shelves and decor. Yep. 5 years old.
  • A bed. Preferably bunk beds. We have a set from my parent's house, but I thinking more and more that they are too big and will completely overwhelm the room...which is not hard to do.
  • Some vertical storage. Maybe either a 5 shelf bookcase with bins at the bottom to corral things, hanging shelves or a mountable cabinet of some sort. I want to be able to store things out of a little boy's reach. :)
  • Possibly move all the boys clothes out of the dresser and into the closet so we can free up some much needed floor space...but then, we would possibly need some more storage options for non-clothing items now stored in the closet.

    {said dresser. a hot mess.}

{here's our current toy storage area from Ikea. we really like it.}


I think this is the bed we're leaning towards. It's $199 at Ikea and I just found it on craigslist for $110 including a cute canopy. We might go for it.

The downside is that we lose under-bed storage. The upside is that it's super compact.
A few more options from our friendly neighborhood Ikea (we like cheap and efficient around here)...

{for easy closet organization. $3.00}

{A $2 wall shelf?!}
{cute and inexpensive brackets}

{a wall mounted storage center that uses bins like our toy storage}


{I love this pack of 3 baskets.
Especially hanging from wall hook
and at $5 for all 3.}
{and speaking of wall hooks...aren't these cute?
they are also rubber so there are no sharp edges and are
$2 a pop.
every little boy needs a place to hang his cape.}


{a darling basket for all the stuffed toys I thought
I would never have as a mom of boys. $5.}

{a big basket option though I think I like this more
for the nursery. $20}


Some of my inspiration....


I love that they're using the Ikea bed.


So nice and neat.


They almost have me convinced that a little boy's closet could actually look like this.


Not a huge room but they seem to make good use of storage space. I might need to get that pillow. :)


I just love so much about this. Check out that curtain rod.


I've shared this picture before, but I really like the idea of them having a place to be creative.

Within reason.


I love this option for storing books. I mean, they're spice racks for crying out loud!


Now THIS....is an interesting idea! Not sure I would be able to maintain sanity trying to keep it looking neat though. You give me much to think about, Pinterest.


Another great use of vertical storage.


More spice racks for storage... on the side of a dresser. I don't know who thought of this but I want to kiss them on the mouth.


I mean, seriously! This is one of the coolest kid rooms I've ever seen. That momma is BA and her son should bring her flowers every day of his life.


This one stops my heart a little.


And there we have it. I can't even let myself think too much about decor until I can figure out how this little space is going to function. I can almost see it though....almost.


So, here's the most important part of this whole post cause I need fresh eyes and a lot of help, people: what would you do?


Wednesday, February 29, 2012

Pinterest Project: Mini Garden in a Crate

About a month ago, Josh brought clementines home from Food Lion in this crate. I was more excited about the crate than clementines. I LOVE crates, but just never could justify the prices I was seeing in stores.


Now that I had a couple of these beauties, I set out for some ideas on how to repurpose them. Here's the one I settled on....


The blogger from the pin decided to plant paper whites, but I was dreaming of my garden and decided that this is where I would start my seeds and maybe start a little indoor herb garden.

I still can't believe how easy this was. Here's what I did:


I lined the bottom with a plastic bag...


Put some rocks in the bottom for drainage...


I trimmed the excess plastic and tucked the sides of the bag down where you can't see it as well....then filled the crate with Miracle Gro organic garden soil. I love that stuff!


The only thing left to do was decide which seeds I wanted to start with....


I decided on parsley, basil, romaine, spinach and swiss chard. I let the seeds soak for about 48 hours in water. I only meant to let them soak overnight, but you know how it is sometimes, you forget everything. :)

So, when I finally planted the seeds, the romaine seeds had already sprouted and it only took about a day for the little green baby leaves to pop up out of the soil. Love that!

I couldn't find my popsicle sticks I would normally use to label the seeds so I just settled on pieces of paper taped to the back of the crate.... not going for perfection here.

The crate lives on a floating shelf in our kitchen right by a sliding glass door that gets tons of light. I think the seedlings are very happy there.


I've seen where people have painted their crates and stenciled "Herbs" across the front (here's a really cute one). You could also do a coat of chalkboard paint and write on it....tons of options here. I just happened to like the crate the way it is. Maybe I'll do something like that later, but right now I am absolutely craving bright color. :)


Aren't they cute? Now, if I could just tell them all apart, we'd be in good shape! ;)


A Little Progress....

I'm pretty sure I'm moving into the more, um.....stationary....part of my pregnancy. At 32 weeks, it now requires noticeable effort to get up and down and do a lot of standing and walking, etc. Don't I sound sad?

So there's a reason things are moving so slowly on getting ready for this little girl....or anything else for that matter. However, I did make a little progress on her closet. As I've said before, a big to-do item was to move all of Manny's clothes and shoes out of that closet and into the other closet that he will now share with Isaiah.


Here's what the nursery closet looked like before (please excuse all the blur):


{Top hanging rack/shelf....what little baby girl doesn't need
a very old and poorly made trumpet?}


{what you see when you look to the left. My wedding dress,
luggage, a changing pad, little pants and onesie for Zoe}


{Lots of storage drawers for pants, socks, underwear,
pajamas, misc shoes that don't fit...}


{To the right: more shelves filled with more shoes in
an upcoming size, sheets and bedding, randomness}


And what surprises does one find when rummaging in the back of a closet that never gets cleaned?

One's husband's childhood Teddy Ruxpin, Grubby the Worm and all the various tapes and books that go with them. Did anyone else have those? His parents were cool parents. :)


Anyway, so I went through Manny's clothes and shoes (he had SO much thanks to hand-me-downs) and packed up anything that I didn't absolutely love. I filled up a huge bin. That was a beautiful feeling. I also went through Isaiah's and edited it down too.

Then, the most amazing thing happened. I was putting Manny's clothes into the closet and dresser that formally only housed Isaiah's things and realized that.....it all fit! And there was room left over! That was one of the things I was most worried about, but having a revelation that children just don't need 20+ shirts was such a gift and I feel so much better about how we're going to make all this work.

We're just going to live with less and it's SO freeing!!!

Moving along....here's Zoe's closet now....
{Sigh. All those little hangers just waiting for
baby girl clothes. Makes me kinda giddy. I'm not sure what
I'm going to do with those fabric covered
canvases I've had forever. I just thought they looked
cute there for the moment. That shelf will actually hold
her laundry basket.}


{To the right: bedding, blankets and things waiting
to dress her crib. I didn't take a pic of what's to the left, but
I cleaned it out and now it just has my wedding dress, Josh's Teddy Ruxpin and Grubby
and our suitcase. There's room now to store more stuff if we need to.}


{Cute little plush hangers.}


{All the empty drawers that will be so useful
since the room is too small for a dresser. Still not sure what to do
with that shoe organizer.}


Anyway, so there's our little bit of progress. I'm so ready to tackle the rest of her room now!


Thursday, February 23, 2012

We're Getting Ready!

I have all these topics running around in my head to write about eventually, but right now I find myself only able to focus on one thing....getting ready for this baby girl.


My absolute favorite OB in the whole wide world told me Tuesday that he is going to have to travel unexpectedly on the day we were scheduled for my c section. So now Zoe's eviction deadline is one day closer...April 19th. Aaaaaaaah!!!

I am in the process of moving the boys clothes into the playroom (their new bedroom) so we can start setting up the nursery. You can read about some of my house goals here, but I thought today I would just post a little more inspiration I have for her room (not that it will actually look like these pictures). :) For some reason, this helps me clear my head a little.


I will start by saying that I am not frou-frou. A pepto-bismol room is not what I'm going for. I'm finding myself drawn to a neutral background with lots of brightly colored accents. And, of course, I always love a touch of handmade and vintage thrown in.


{Prepare for sensory overload...}


I love yellow! I'm planning to paint her changing table a beautiful, buttery shade of happiness. :)


Our nursery is tiny and this one is not, but I love all the little accents.


This picture is one of my favs because it shows what we're working with...a dark wood crib and yellow changing table.


Oh how I love a little vintage!


Look at that turquoise chandelier!


Rick-rack in the valence...blue dresser/changing table...be still my heart.


And inspiration for some of the smaller details....


Fabric poms. So full and lush. I'm hoping I have the energy to make a couple.


This is a definite for her room. Thankfully, I have tons of fabrics and have already bought the embroidery hoops. :)


I read the instructions for this mobile and am pretty sure I can do it with some shortcuts (like hot glue and no sewing). So happy and cute.

The next 3 are from a NC artist and I am completely smitten with her work. She's super affordable, a fellow etsy-ian and her pieces are just so darn whimsical and happy. I plan to frame one of these for Zoe's room and I hope to get another one for our kitchen. These are my 3 favs for the nursery.

Ladies and Gentlemen....Katie Daisy.


I'll be sure to post updates on her room as we make more progress, but if you have any ideas for me, do share!


{Linked with New Nostalgia}

Pages